Hardscaping Made Easy

Tips for Patios, Decks & More

Hardscaping Made Easy

The Bay Area’s weather is perfect for outdoor living. Learn how to create a backyard space your family can fully enjoy.

  • Get Started: Start by learning more about hardscaping.
  • Find: Find a top rated professional to help with your project.
  • Research: Dive into more specific topics related to outdoor living.
Shares

Get Started

Hardscaping Basics

  • Reimagine Your Yard

    Paving Stones

    Find out how paving stones can transform your patio or driveway.

  • A Guide to Revamping Your Outdoor Living Space

    Backyard improvement

    Discover changes (both big and small) you can make to improve your outdoor living space.

  • Expert Advice on Decks

    Decks

    Contractors walk through the steps of building a new deck for your home.

Find

Research

TIPS FROM LOCAL EXPERTS

Renato do Carmo

D’Carmo Interlocking Pavers, Inc.

Weston Leavens

Deckmaster Fine Decks, Inc.

Leila Jacobsen

Awnco Retractables

Russell Calhoon

Paradigm Concrete & Construction, Inc.

Charles Lee

California Concrete Pump Pros

Kenny Johnson

Delta Pacific Builders Inc

Steve Labourdette

Labourdette Construction

Thomas Daly

Thomas A Daly Construction

Glayston Soares

Mr. Pavers Contractor Services, Inc.

Paver Restoration: A Cost-Effective Alternative to Replacement

Paver Restoration: A Cost-Effective Alternative to Replacement

RICHMOND — If your paver patio or driveway is showing signs of age, you probably assume you need to have it replaced. However, did you know there’s an alternative option that can restore the beauty of your paver feature for a fraction of the cost? With a paver restoration service, your existing pavers can be refurbished and made to look new again.

A paver restoration typically includes the following measures:

  • Power washing with hot water
  • Application of a chemical cleaner to remove stains
  • Replacement of joint sand and removal of weeds
  • Application of a high-end sealant to enhance paver coloration

If your paver feature contains any cracked or damaged sections, additional measures will be needed to restore its integrity. Your contractor will attempt to find replacement pavers on the market; if suitable replacements can’t be found, the contractor will have to work with the existing ones. To ensure you have pavers on hand for these types of future repairs, it’s good to keep an additional 15 to 20 pavers from your feature’s original installation.

A Cutting-Edge Product for Non-Wood Decks

A Cutting-Edge Product for Non-Wood Decks

SEBASTOPOL — Many people love authentic wood decks, but not everyone wants to deal with the maintenance they require. That’s why, over the last two decades, we’ve seen a profusion of non-wood or “composite” decking materials hit the market, each of which has achieved varying degrees of quality and performance.

From the beginning, composite decking manufacturers have faced two main challenges. The first is achieving the appearance of authentic wood; after all, homeowners may not want the maintenance that comes with real wood, but they do want the aesthetics. The second challenge is preventing excessive heat buildup in warm weather, a common problem due to the sheer density of composite materials.

One of the most recent products to hit the market comes closer than ever to meeting these challenges: Zuri® Premium Decking by Royal®. Zuri decking features a simulated wood grain that mimics natural wood more accurately than any previous product. Additionally, Zuri decking resists heat gain when in direct sunlight—in fact, it’s so precisely engineered that it stays within a few degrees of the temperature that similarly colored natural woods would reach under comparable conditions.

Zuri decking’s performance highlights don’t end there. It’s also durable—five times tougher and more scratch-resistant than any composite product on the market. Furthermore, it provides superior resistance against color fading, so if you have to replace a deck board in five years, it will likely match up perfectly with the older ones.

How to Properly Maintain Window Awnings

How to Properly Maintain Window Awnings

SAN RAFAEL — When it comes to window awnings, regular maintenance is crucial for keeping them looking and performing their best. Awning maintenance mainly consists of routine cleaning, which prevents dirt from becoming embedded in the fabric. In addition to regularity, however, it’s important to use correct procedures when cleaning an awning.

After brushing off any loose dirt, apply a cleaning agent, which can range from a mild detergent or dish soap to a solution of vinegar or ammonia. Apply the solution with a sponge or soft bristle brush. If there are a lot of stains, add a little bleach or ammonia to the solution—it won’t hurt the acrylic fabric.

When cleaning an awning, it’s important to be careful of the stitch line, which sits on top of the fabric. The threading can break if you scrub it too vigorously, so either scrub gently or go around it.

After scrubbing, allow the cleaning solution to sit and soak in the fabric for several minutes before rinsing. While a thorough rinsing is important, using a pressure washer is discouraged because it can be too harsh on the fabric. After cleaning, allow the awning to air dry completely before returning it to its place.

Often-Overlooked Aspects of a Concrete Project

Often-Overlooked Aspects of a Concrete Project

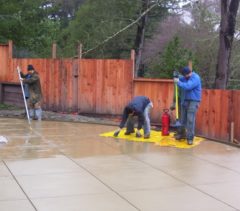
ANTIOCH — If you’re planning a concrete project, be sure to consider the following aspects:

Minimum cost

Most concrete contractors have a minimum charge for concrete work. If you only have one small project in mind, it might not meet that minimum charge, in which case you may end up overpaying to have it done. For this reason, it’s good to look around and see if there are any other small projects you can incorporate into the job. This will help you get more value for your money.

Drainage

This is a critical aspect of any concrete project. When water isn’t able to properly drain from the area beneath and around the installation, it often leads to cosmetic problems and even premature failure. Prior to the job, your concrete contractor should make sure there’s adequate drainage for the installation area. If there isn’t, the issue will need to be addressed before moving forward.

Post-installation maintenance

After your concrete installation is in place, you may feel inclined to hose it down to prevent cracking. However, if you do so, make sure you do it at night and never during the daylight hours. If you hose off your concrete during the day, the water will dry up on the concrete and cause a blotchiness or efflorescence. While this can often be cleaned off with a vinegar/water solution, it’s best to avoid it in the first place.

How to Protect Your Concrete

How to Protect Your Concrete

ANTIOCH — Many people don’t realize that even though concrete is a hard, sturdy product, it’s also extremely porous. Because it readily absorbs liquids, concrete areas such as driveways and patios are susceptible to staining by everything from motor oil to red wine.

A good way to prevent this from happening is to have your concrete areas sealed on an annual basis. The seal acts as a clear coat that sits on top of the concrete surface and makes it impenetrable to liquids. When a liquid spills on sealed concrete, you can simply hose it down and it comes right off without being absorbed and leaving a stain.

Considerations for a Patio Cover

Considerations for a Patio Cover

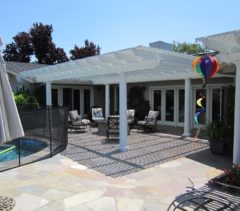
BETHEL ISLAND — A patio cover presents a simple, affordable way to bridge the gap between your indoor and outdoor living spaces. While a patio cover isn’t a complex installation, there are a few important things to consider before purchasing one.

First, you’ll need to consider what style of patio cover you want. One option is a solid cover. Manufactured from insulated material, a solid cover doesn’t simply provide shade; it actually decreases solar heat gain to make your patio several degrees cooler than a normal shaded area. Additionally, a solid cover provides shelter from the rain, so you can enjoy your patio in winter as well as summer. Another style to consider is a lattice cover—a louvered structure that provides some shade but also lets in some sunlight. Depending on your patio design and personal preferences, this may be a good option.

You’ll also need to consider supplementary features like cooling, heating and lighting. Ceiling fans and other auxiliary cooling/heating elements give you more control over the temperature in your patio space. You can also add lighting to your patio cover’s ceiling or posts, which will provide a pleasant after-dark ambience and optimize your patio for evening lounging and entertaining.

Given the various options available for patio covers, be sure to consider your needs and preferences and discuss these with your contractor. This will help ensure your new patio cover provides exactly what you’re looking for.

The Importance of Proper Deck Waterproofing

The Importance of Proper Deck Waterproofing

SEBASTOPOL — When installing a new deck, waterproofing is a crucial aspect of attaching it to your house. By taking thorough measures to properly waterproof your deck, you can expect it to have a longer lifespan and avoid rot issues with both the deck and your house.

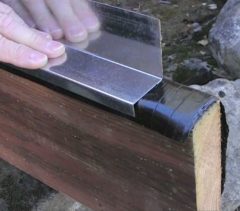
One of the main components of deck waterproofing is the flashing, which consists of a couple different elements. First, there’s the Z bar, which is a piece of metal in the shape of a “Z” that fits over the wooden ledger to deflect rain and moisture. Another important component is membrane flashing, which is installed under the Z bar, behind the ledger and in any area where moisture is a concern.

Siding is also important when it comes to deck waterproofing. When attaching a deck to a house, cement siding works best because it provides a solid, waterproof barrier. Often, when a contractor replaces a deck, they’ll find the house has been infected with rot due to inappropriate siding installation.

When completed, both the deck and the home will be protected by several layers of waterproofing material that include various pieces of flashing and siding. All these components work together like shingles to repel water, which will keep your deck and home safe from rot.

Assessing Deck Safety

Assessing Deck Safety

MILL VALLEY — In the past, many wood decks were built with Douglas fir wood, but time has shown it’s not a good material to use due to its susceptibility to rot. During my 30 years as a deck builder in Marin County, I’ve had to replace countless Douglas fir decks that were rotted out, which in many cases created very dangerous conditions. In particular, if a deck’s support beams are compromised, they could potentially break and cause the whole thing to fall apart. For this reason, if you have an old Douglas fir deck, I recommend having it professionally assessed for safety.

If you need to replace a Douglas fir deck, don’t repeat the same mistake that was made in the past: Use a high-quality, pressure-treated redwood or cedar product. If well-maintained, these materials will last a lifetime, ensuring safety and giving you a great value for your investment.

A Critical Aspect of Paver Installation

A Critical Aspect of Paver Installation

RODEO — With the high amount of soil movement and seismic activity that occurs in California, it’s crucial for paver features like driveways and patios to have a solid base. Proper base preparation consists of several steps, including excavation, laying down geotextile fabric and base rock compaction. Let’s look at these steps in more detail:

Excavation

The surface beneath an incoming paver installation must be excavated to make room for the base rock. The recommended excavation depth can vary depending on the type of paver feature. For a backyard patio, 7 to 8 inches will suffice, whereas the recommended depth for a driveway is 9 to 10 inches. Since a driveway has more weight to support than a patio, additional base rock is needed to ensure stability.

Geotextile fabric

This permeable material is laid down following excavation. By acting as a barrier between the soil and the base rock, geotextile fabric increases a paver installation’s overall stability. While it’s technically only required for driveways, laying down geotextile fabric is a smart step for any paver feature.

Base rock compaction

After the geotextile fabric is in place, the excavated area is filled in with base rock (typically recycled concrete). The base rock is then compacted using heavy machinery. To ensure thorough compaction, the base rock is usually compacted in two layers.

Due to the importance of these steps, it’s wise to verify that your contractor is following proper procedure when preparing your paver feature’s base. Less scrupulous contractors may attempt to cut corners by excavating to a lesser depth or compacting the base rock altogether instead of in layers. In addition to asking your contractor about their procedure, you can double-check the work yourself—for example, you can use a tape measure to verify correct excavation depth. This will help you ensure your paver feature is built to last.